How to Fix Wi-Fi Problems on Your iPhone 8 / iPhone X with iOS 11?
![]() 09/29/2017
09/29/2017
![]() 10543
10543
iOS 11 comes with tons of cool new features and improvements, but sadly, like any other major iOS software update, it comes with its own set of problems. One of the issues people are facing after updating their iPhone to iOS 11 is Wi-Fi problems.

The issues being reported include not being able to connect to a Wi-Fi network, getting an incorrect password prompt, Wi-Fi settings grayed out, dropping connection intermittently or speeds being extremely slow.
Here are a few tips to fix these Wi-Fi problems with iOS 11:
1. Force Restart
Like all tech problems, there is no harm in starting off by force restarting your iPhone to see it helps.
Hold down the Sleep/Wake button and the Volume down button at the same time for at least ten seconds, until the screen goes blank and Apple logo appears.
#2. Forget Wi-Fi Network and Rejoin
If you’re not able to connect to a Wi-Fi Network and being prompted that the password you’ve entered is incorrect despite entering the correct password, then try to forget the Wi-Fi network, and join the network again.
To forget the Wi-Fi network, tap on the Wi-Fi network from the list under Settings > Wi-Fi. Then tap on Forget This Network. You will be prompted with a popup message asking you if you want to forget Wi-Fi Network. Tap Forget to forget the network.
Now go back to Settings > Wi-Fi, select the network again, enter the password, and Join the network again to see if it helps.
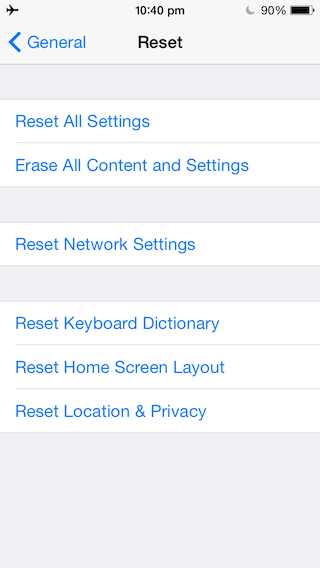
#3. Reset Network Settings
Most networking related issues I’ve experienced have been fixed after resetting network settings. Resetting these settings flushes caches and clears DHCP settings and other networking related info. To reset network settings, open the Settings app and navigate to Settings > General > Reset and tap on Reset Network Settings.
#4. Disable VPN
If you have enabled via the Settings app or a VPN app, then try to disable VPN to see if it resolves the issue. You can disable VPN via the Settings app and navigate to the VPNsettings to disable the Status toggle from Connected to Not Connected. If you are not able to disable it then launch the VPN app to disable VPN temporarily to figure out if it resolves the WiFi problem on your iPhone.
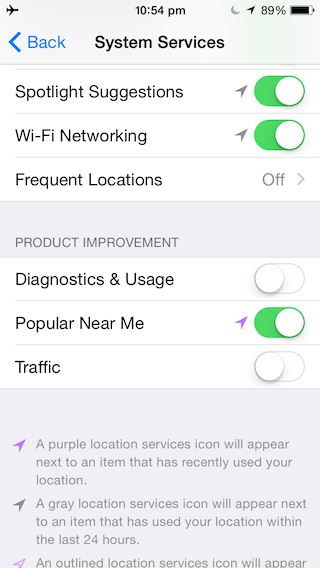
#5. Disable Wi-Fi Networking Services
Many users have reported that they’ve solved their issues by disabling Wi-Fi Networking under Settings > Privacy > Location Services > System Services. This only relates to your location being used for Wi-Fi Networking, so it doesn’t disable Wi-Fi entirely.
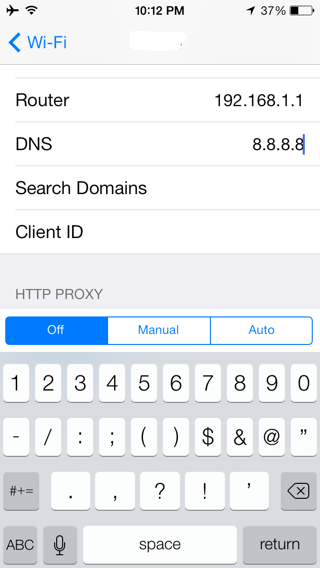
#6. Set Custom DNS
Often times, if your ISPs DNS servers are having problems, you can switch to Google DNS or OpenDNS. You can follow the instructions in our post linked below to change your DNS settings.
#7. Ask To Join Network
This is not an ideal solution, but if none of the solutions mentioned above work, then you can try enabling “Ask to Join Networks” by going to Settings > Wi-Fi.
#8. Wi-Fi Assist
iOS includes a feature called Wi-Fi Assist, which provides more reliable Internet connections when your Wi-Fi network becomes spotty. However, some readers have reported that turning it off and turning it back on seemed to help resolve the Wi-Fi problems. To turn off Wi-Fi Assist, launch the Settings app and navigate to Settings -> Cellular (Mobile in some regions) and scroll down to the bottom where you will see Wi-Fi Assist. Tap on the toggle to turn it off.

#9. Restore and Setup as new iPhone
If none of these tips fix your issues, the last resort is to restore your iPhone via iTunes and set it up as a new device. This way, you start afresh and get rid of possibly problematic customizations and settings on your device. Follow the instructions in the post linked below to do a clean restore to the latest version of iOS via iTunes.